Thursday, September 22, 2011

Creating your first virtual machine

Creating your first virtual machine

Click on the "New" button at the top of the VirtualBox Manager window. A wizard will pop up to guide you through setting up a new virtual machine (VM):
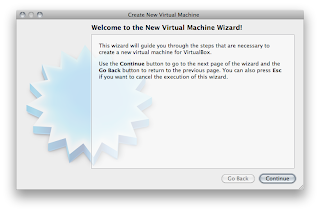


On the following pages, the wizard will ask you for the bare minimum of information that is needed to create a VM, in particular:

1. The VM name will later be shown in the VM list of the VirtualBox Manager window, and it will be used for the VM's files on disk. Even though any name could be used, keep in mind that once you have created a few VMs, you will appreciate if you have given your VMs rather informative names; "My VM" would thus be less useful than "Windows XP SP2 with OpenOffice".
2. For "Operating System Type", select the operating system that you want to install later. The supported operating systems are grouped; if you want to install something very unusual that is not listed, select "Other". Depending on your selection, VirtualBox will enable or disable certain VM settings that your guest operating system may require. This is particularly important for 64-bit guests (see the section called “64-bit guests”). It is therefore recommended to always set it to the correct value.
3. On the next page, select the memory (RAM) that VirtualBox should allocate every time the virtual machine is started. The amount of memory given here will be taken away from your host machine and presented to the guest operating system, which will report this size as the (virtual) computer's installed RAM.
Note: Choose this setting carefully! The memory you give to the VM will not be available to your host OS while the VM is running, so do not specify more than you can spare. For example, if your host machine has 1 GB of RAM and you enter 512 MB as the amount of RAM for a particular virtual machine, while that VM is running, you will only have 512 MB left for all the other software on your host. If you run two VMs at the same time, even more memory will be allocated for the second VM (which may not even be able to start if that memory is not available). On the other hand, you should specify as much as your guest OS (and your applications) will require to run properly.

A Windows XP guest will require at least a few hundred MB RAM to run properly, and Windows Vista will even refuse to install with less than 512 MB. Of course, if you want to run graphics-intensive applications in your VM, you may require even more RAM.

So, as a rule of thumb, if you have 1 GB of RAM or more in your host computer, it is usually safe to allocate 512 MB to each VM. But, in any case, make sure you always have at least 256 to 512 MB of RAM left on your host operating system. Otherwise you may cause your host OS to excessively swap out memory to your hard disk, effectively bringing your host system to a standstill.

As with the other settings, you can change this setting later, after you have created the VM.
4. Next, you must specify a virtual hard disk for your VM.
There are many and potentially complicated ways in which VirtualBox can provide hard disk space to a VM (see Chapter 5, Virtual storage for details), but the most common way is to use a large image file on your "real" hard disk, whose contents VirtualBox presents to your VM as if it were a complete hard disk. This file represents an entire hard disk then, so you can even copy it to another host and use it with another VirtualBox installation.

The wizard shows you the following window:
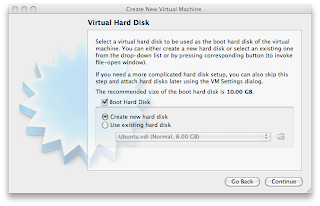

Here you have the following options:
* To create a new, empty virtual hard disk, press the "New" button.
* You can pick an existing disk image file.

The drop-down list presented in the window contains all disk images which are currently remembered by VirtualBox, probably because they are currently attached to a virtual machine (or have been in the past).
Alternatively, you can click on the small folder button next to the drop-down list to bring up a standard file dialog, which allows you to pick any disk image file on your host disk.
Most probably, if you are using VirtualBox for the first time, you will want to create a new disk image. Hence, press the "New" button.
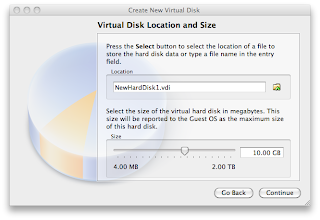
This brings up another window, the "Create New Virtual Disk Wizard", which helps you create a new disk image file in the new virtual machine's folder.
VirtualBox supports two types of image files:
* A dynamically allocated file will only grow in size when the guest actually stores data on its virtual hard disk. It will therefore initially be small on the host hard drive and only later grow to the size specified as it is filled with data.
* A fixed-size file will immediately occupy the file specified, even if only a fraction of the virtual hard disk space is actually in use. While occupying much more space, a fixed-size file incurs less overhead and is therefore slightly faster than a dynamically allocated file.
For details about the differences, please refer to the section called “Disk image files (VDI, VMDK, VHD, HDD)”.
To prevent your physical hard disk from running full, VirtualBox limits the size of the image file. Still, it needs to be large enough to hold the contents of your operating system and the applications you want to install -- for a modern Windows or Linux guest, you will probably need several gigabytes for any serious use:
After having selected or created your image file, again press "Next" to go to the next page.
5. After clicking on "Finish", your new virtual machine will be created. You will then see it in the list on the left side of the Manager window, with the name you entered initially.


Running your virtual machine
To start a virtual machine, you have several options:
* Double-click on its entry in the list within the Manager window or
* select its entry in the list in the Manager window it and press the "Start" button at the top or
* for virtual machines created with VirtualBox 4.0 or later, navigate to the "VirtualBox VMs" folder in your system user's home directory, find the subdirectory of the machine you want to start and double-click on the machine settings file (with a .vbox file extension).
This opens up a new window, and the virtual machine which you selected will boot up. Everything which would normally be seen on the virtual system's monitor is shown in the window, as can be seen with the image in the section called “Some terminology”.

In general, you can use the virtual machine much like you would use a real computer. There are couple of points worth mentioning however.
Starting a new VM for the first time
When a VM gets started for the first time, another wizard -- the "First Start Wizard" -- will pop up to help you select an installation medium. Since the VM is created empty, it would otherwise behave just like a real computer with no operating system installed: it will do nothing and display an error message that no bootable operating system was found.
For this reason, the wizard helps you select a medium to install an operating system from.
* If you have physical CD or DVD media from which you want to install your guest operating system (e.g. in the case of a Windows installation CD or DVD), put the media into your host's CD or DVD drive.
Then, in the wizard's drop-down list of installation media, select "Host drive" with the correct drive letter (or, in the case of a Linux host, device file). This will allow your VM to access the media in your host drive, and you can proceed to install from there.
* If you have downloaded installation media from the Internet in the form of an ISO image file (most probably in the case of a Linux distribution), you would normally burn this file to an empty CD or DVD and proceed as just described. With VirtualBox however, you can skip this step and mount the ISO file directly. VirtualBox will then present this file as a CD or DVD-ROM drive to the virtual machine, much like it does with virtual hard disk images.
For this case, the wizard's drop-down list contains a list of installation media that were previously used with VirtualBox.
If your medium is not in the list (especially if you are using VirtualBox for the first time), select the small folder icon next to the drop-down list to bring up a standard file dialog, with which you can pick the image file on your host disks.
In both cases, after making the choices in the wizard, you will be able to install your operating system.
Capturing and releasing keyboard and mouse
As of version 3.2, VirtualBox provides a virtual USB tablet device to new virtual machines through which mouse events are communicated to the guest operating system. As a result, if you are running a modern guest operating system that can handle such devices, mouse support may work out of the box without the mouse being "captured" as described below; see the section called “"Motherboard" tab” for more information.
Otherwise, if the virtual machine only sees standard PS/2 mouse and keyboard devices, since the operating system in the virtual machine does not "know" that it is not running on a real computer, it expects to have exclusive control over your keyboard and mouse. This is, however, not the case since, unless you are running the VM in full-screen mode, your VM needs to share keyboard and mouse with other applications and possibly other VMs on your host.
As a result, initially after installing a guest operating system and before you install the Guest Additions (we will explain this in a minute), only one of the two -- your VM or the rest of your computer -- can "own" the keyboard and the mouse. You will see a second mouse pointer which will always be confined to the limits of the VM window. Basically, you activate the VM by clicking inside it.
To return ownership of keyboard and mouse to your host operating system, VirtualBox reserves a special key on your keyboard for itself: the "host key". By default, this is the right Control key on your keyboard; on a Mac host, the default host key is the left Command key. You can change this default in the VirtualBox Global Settings. In any case, the current setting for the host key is always displayed at the bottom right of your VM window, should you have forgotten about it:

Next

Wednesday, September 21, 2011

VirtualBox

VirtualBox is a cross-platform virtualization application. What does that mean? For one thing, it installs on your existing Intel or AMD-based computers, whether they are running Windows, Mac, Linux or Solaris operating systems. Secondly, it extends the capabilities of your existing computer so that it can run multiple operating systems (inside multiple virtual machines) at the same time. So, for example, you can run Windows and Linux on your Mac, run Windows Server 2008 on your Linux server, run Linux on your Windows PC, and so on, all alongside your existing applications. You can install and run as many virtual machines as you like -- the only practical limits are disk space and memory.

VirtualBox is deceptively simple yet also very powerful. It can run everywhere from small embedded systems or desktop class machines all the way up to datacenter deployments and even Cloud environments.

The following screenshot shows you how VirtualBox, installed on a Mac computer, is running Windows 7 in a virtual machine window:


In this User Manual, we'll begin simply with a quick introduction to virtualization and how to get your first virtual machine running with the easy-to-use VirtualBox graphical user interface. Subsequent chapters will go into much more detail covering more powerful tools and features, but fortunately, it is not necessary to read the entire User Manual before you can use VirtualBox.

You can find a summary of VirtualBox's capabilities in the section called “Features overview”. For existing VirtualBox users who just want to see what's new in this release, Why is virtualization useful?

The techniques and features that VirtualBox provides are useful for several scenarios:

* Running multiple operating systems simultaneously. VirtualBox allows you to run more than one operating system at a time. This way, you can run software written for one operating system on another (for example, Windows software on Linux or a Mac) without having to reboot to use it. Since you can configure what kinds of "virtual" hardware should be presented to each such operating system, you can install an old operating system such as DOS or OS/2 even if your real computer's hardware is no longer supported by that operating system.
* Easier software installations. Software vendors can use virtual machines to ship entire software configurations. For example, installing a complete mail server solution on a real machine can be a tedious task. With VirtualBox, such a complex setup (then often called an "appliance") can be packed into a virtual machine. Installing and running a mail server becomes as easy as importing such an appliance into VirtualBox.
* Testing and disaster recovery. Once installed, a virtual machine and its virtual hard disks can be considered a "container" that can be arbitrarily frozen, woken up, copied, backed up, and transported between hosts.

On top of that, with the use of another VirtualBox feature called "snapshots", one can save a particular state of a virtual machine and revert back to that state, if necessary. This way, one can freely experiment with a computing environment. If something goes wrong (e.g. after installing misbehaving software or infecting the guest with a virus), one can easily switch back to a previous snapshot and avoid the need of frequent backups and restores.

Any number of snapshots can be created, allowing you to travel back and forward in virtual machine time. You can delete snapshots while a VM is running to reclaim disk space.
* Infrastructure consolidation. Virtualization can significantly reduce hardware and electricity costs. Most of the time, computers today only use a fraction of their potential power and run with low average system loads. A lot of hardware resources as well as electricity is thereby wasted. So, instead of running many such physical computers that are only partially used, one can pack many virtual machines onto a few powerful hosts and balance the loads between them.

Some terminology

When dealing with virtualization (and also for understanding the following chapters of this documentation), it helps to acquaint oneself with a bit of crucial terminology, especially the following terms:

Host operating system (host OS).

This is the operating system of the physical computer on which VirtualBox was installed. There are versions of VirtualBox for Windows, Mac OS X, Linux and Solaris hosts; for details, please see the section called “Supported host operating systems”.

Most of the time, this User Manual discusses all VirtualBox versions together. There may be platform-specific differences which we will point out where appropriate.
Guest operating system (guest OS).

This is the operating system that is running inside the virtual machine. Theoretically, VirtualBox can run any x86 operating system (DOS, Windows, OS/2, FreeBSD, OpenBSD), but to achieve near-native performance of the guest code on your machine, we had to go through a lot of optimizations that are specific to certain operating systems. So while your favorite operating system may run as a guest, we officially support and optimize for a select few (which, however, include the most common ones).

See the section called “Supported guest operating systems” for details.
Virtual machine (VM).

This is the special environment that VirtualBox creates for your guest operating system while it is running. In other words, you run your guest operating system "in" a VM. Normally, a VM will be shown as a window on your computer's desktop, but depending on which of the various frontends of VirtualBox you use, it can be displayed in full-screen mode or remotely on another computer.

In a more abstract way, internally, VirtualBox thinks of a VM as a set of parameters that determine its behavior. They include hardware settings (how much memory the VM should have, what hard disks VirtualBox should virtualize through which container files, what CDs are mounted etc.) as well as state information (whether the VM is currently running, saved, its snapshots etc.). These settings are mirrored in the VirtualBox Manager window as well as the VBoxManage command line program; see Chapter 8, VBoxManage. In other words, a VM is also what you can see in its settings dialog.
Guest Additions.

This refers to special software packages which are shipped with VirtualBox but designed to be installed inside a VM to improve performance of the guest OS and to add extra features. This is described in detail in Chapter 4, Guest Additions.

Features overview

Here's a brief outline of VirtualBox's main features:

* Portability. VirtualBox runs on a large number of 32-bit and 64-bit host operating systems (again, see the section called “Supported host operating systems” for details).

VirtualBox is a so-called "hosted" hypervisor (sometimes referred to as a "type 2" hypervisor). Whereas a "bare-metal" or "type 1" hypervisor would run directly on the hardware, VirtualBox requires an existing operating system to be installed. It can thus run alongside existing applications on that host.

To a very large degree, VirtualBox is functionally identical on all of the host platforms, and the same file and image formats are used. This allows you to run virtual machines created on one host on another host with a different host operating system; for example, you can create a virtual machine on Windows and then run it under Linux.

In addition, virtual machines can easily be imported and exported using the Open Virtualization Format (OVF, see the section called “Importing and exporting virtual machines”), an industry standard created for this purpose. You can even import OVFs that were created with a different virtualization software.
* No hardware virtualization required. For many scenarios, VirtualBox does not require the processor features built into newer hardware like Intel VT-x or AMD-V. As opposed to many other virtualization solutions, you can therefore use VirtualBox even on older hardware where these features are not present. The technical details are explained in the section called “Hardware vs. software virtualization”.
* Guest Additions: shared folders, seamless windows, 3D virtualization. The VirtualBox Guest Additions are software packages which can be installed inside of supported guest systems to improve their performance and to provide additional integration and communication with the host system. After installing the Guest Additions, a virtual machine will support automatic adjustment of video resolutions, seamless windows, accelerated 3D graphics and more. The Guest Additions are described in detail in Chapter 4, Guest Additions.

In particular, Guest Additions provide for "shared folders", which let you access files from the host system from within a guest machine. Shared folders are described in the section called “Shared folders”.
* Great hardware support. Among others, VirtualBox supports:
oGuest multiprocessing (SMP). VirtualBox can present up to 32 virtual CPUs to each virtual machine, irrespective of how many CPU cores are physically present on your host.
oUSB device support. VirtualBox implements a virtual USB controller and allows you to connect arbitrary USB devices to your virtual machines without having to install device-specific drivers on the host. USB support is not limited to certain device categories. For details, see the section called “USB settings”.
oHardware compatibility. VirtualBox virtualizes a vast array of virtual devices, among them many devices that are typically provided by other virtualization platforms. That includes IDE, SCSI and SATA hard disk controllers, several virtual network cards and sound cards, virtual serial and parallel ports and an Input/Output Advanced Programmable Interrupt Controller (I/O APIC), which is found in many modern PC systems. This eases cloning of PC images from real machines and importing of third-party virtual machines into VirtualBox.
oFull ACPI support. The Advanced Configuration and Power Interface (ACPI) is fully supported by VirtualBox. This eases cloning of PC images from real machines or third-party virtual machines into VirtualBox. With its unique ACPI power status support, VirtualBox can even report to ACPI-aware guest operating systems the power status of the host. For mobile systems running on battery, the guest can thus enable energy saving and notify the user of the remaining power (e.g. in fullscreen modes).
oMultiscreen resolutions. VirtualBox virtual machines support screen resolutions many times that of a physical screen, allowing them to be spread over a large number of screens attached to the host system.
oBuilt-in iSCSI support. This unique feature allows you to connect a virtual machine directly to an iSCSI storage server without going through the host system. The VM accesses the iSCSI target directly without the extra overhead that is required for virtualizing hard disks in container files. For details, see the section called “iSCSI servers”.
oPXE Network boot. The integrated virtual network cards of VirtualBox fully support remote booting via the Preboot Execution Environment (PXE).
* Multigeneration branched snapshots. VirtualBox can save arbitrary snapshots of the state of the virtual machine. You can go back in time and revert the virtual machine to any such snapshot and start an alternative VM configuration from there, effectively creating a whole snapshot tree. For details, see the section called “Snapshots”. You can create and delete snapshots while the virtual machine is running.
* Clean architecture; unprecedented modularity. VirtualBox has an extremely modular design with well-defined internal programming interfaces and a clean separation of client and server code. This makes it easy to control it from several interfaces at once: for example, you can start a VM simply by clicking on a button in the VirtualBox graphical user interface and then control that machine from the command line, or even remotely. See the section called “Alternative front-ends” for details.

Due to its modular architecture, VirtualBox can also expose its full functionality and configurability through a comprehensive software development kit (SDK), which allows for integrating every aspect of VirtualBox with other software systems. Please see Chapter 11, VirtualBox programming interfaces for details.
* Remote machine display. The VirtualBox Remote Desktop Extension (VRDE) allows for high-performance remote access to any running virtual machine. This extension supports the Remote Desktop Protocol (RDP) originally built into Microsoft Windows, with special additions for full client USB support.

The VRDE does not rely on the RDP server that is built into Microsoft Windows; instead, it is plugged directly into the virtualization layer. As a result, it works with guest operating systems other than Windows (even in text mode) and does not require application support in the virtual machine either. The VRDE is described in detail in the section called “Remote display (VRDP support)”.

On top of this special capacity, VirtualBox offers you more unique features:
oExtensible RDP authentication. VirtualBox already supports Winlogon on Windows and PAM on Linux for RDP authentication. In addition, it includes an easy-to-use SDK which allows you to create arbitrary interfaces for other methods of authentication; see the section called “RDP authentication” for details.
oUSB over RDP. Via RDP virtual channel support, VirtualBox also allows you to connect arbitrary USB devices locally to a virtual machine which is running remotely on a VirtualBox RDP server; see the section called “Remote USB” for details.

Supported host operating systems

Currently, VirtualBox runs on the following host operating systems:

*Windows hosts:
o Windows XP, all service packs (32-bit)
o Windows Server 2003 (32-bit)
o Windows Vista (32-bit and 64-bit[1]).
o Windows Server 2008 (32-bit and 64-bit)
o Windows 7 (32-bit and 64-bit)
*Mac OS X hosts:[2]
o10.5 (Leopard, 32-bit)
o10.6 (Snow Leopard, 32-bit and 64-bit)
o10.7 (Lion, 32-bit and 64-bit)

*Linux hosts (32-bit and 64-bit[3]). Among others, this includes:
oUbuntu 6.06 ("Dapper Drake"), 6.10 ("Edgy Eft"), 7.04 ("Feisty Fawn"), 7.10 ("Gutsy Gibbon"), 8.04 ("Hardy Heron"), 8.10 ("Intrepid Ibex"), 9.04 ("Jaunty Jackalope"), 9.10 ("Karmic Koala"), 10.04 ("Lucid Lynx"), 10.10 ("Maverick Meerkat), 11.04 ("Natty Narwhal").
oDebian GNU/Linux 3.1 ("sarge"), 4.0 ("etch"), 5.0 ("lenny") and 6.0 ("squeeze")
oOracle Enterprise Linux 4 and 5, Oracle Linux 6
oRedhat Enterprise Linux 4, 5 and 6
oFedora Core 4 to 15
oGentoo Linux
oSUSE Linux 9, 10 and 11, openSUSE 10.3, 11.0, 11.1, 11.2, 11.3, 11.4
oMandriva 2007.1, 2008.0, 2009.1, 2010.0 and 2010.1

It should be possible to use VirtualBox on most systems based on Linux kernel 2.6 using either the VirtualBox installer or by doing a manual installation; see the section called “Installing on Linux hosts”. However, the formally tested and supported Linux distributions are those for which we offer a dedicated package.

Note that starting with VirtualBox 2.1, Linux 2.4-based host operating systems are no longer supported.
*Solaris hosts (32-bit and 64-bit) are supported with the restrictions listed in Chapter 14, Known limitations:
oSolaris 11 Express (Nevada build 86 and higher, OpenSolaris 2008.05 and higher)
oSolaris 10 (u8 and higher)

Installing VirtualBox and extension packs

VirtualBox comes in many different packages, and installation depends on your host operating system. If you have installed software before, installation should be straightforward: on each host platform, VirtualBox uses the installation method that is most common and easy to use. If you run into trouble or have special requirements, please refer to Chapter 2, Installation details for details about the various installation methods.

Starting with version 4.0, VirtualBox is split into several components.

1.The base package consists of all open-source components and is licensed under the GNU General Public License V2.
2.Additional extension packs can be downloaded which extend the functionality of the VirtualBox base package. Currently, Oracle provides the one extension pack, which can be found at http://www.virtualbox.org and provides the following added functionality:
1.The virtual USB 2.0 (EHCI) device; see the section called “USB settings”.
2.VirtualBox Remote Desktop Protocol (VRDP) support; see the section called “Remote display (VRDP support)”.
3.Intel PXE boot ROM with support for the E1000 network card.
4.Experimental support for PCI passthrough on Linux hosts; see the section called “PCI passthrough”.

VirtualBox extension packages have a .vbox-extpack file name extension. To install an extension, simply double-click on the package file, and the VirtualBox Manager will guide you through the required steps.

To view the extension packs that are currently installed, please start the VirtualBox Manager (see the next section). From the "File" menu, please select "Preferences". In the window that shows up, go to the "Extensions" category which shows you the extensions which are currently installed and allows you to remove a package or add a new one.

Alternatively you can use VBoxManage on the command line: see the section called “VBoxManage extpack” for details.

Starting VirtualBox

After installation, you can start VirtualBox as follows:

* On a Windows host, in the standard "Programs" menu, click on the item in the "VirtualBox" group. On Vista or Windows 7, you can also type "VirtualBox" in the search box of the "Start" menu.
* On a Mac OS X host, in the Finder, double-click on the "VirtualBox" item in the "Applications" folder. (You may want to drag this item onto your Dock.)
* On a Linux or Solaris host, depending on your desktop environment, a "VirtualBox" item may have been placed in either the "System" or "System Tools" group of your "Applications" menu. Alternatively, you can type VirtualBox in a terminal.

When you start VirtualBox for the first time, a window like the following should come up:


This window is called the "VirtualBox Manager". On the left, you can see a pane that will later list all your virtual machines. Since you have not created any, the list is empty. A row of buttons above it allows you to create new VMs and work on existing VMs, once you have some. The pane on the right displays the properties of the virtual machine currently selected, if any. Again, since you don't have any machines yet, the pane displays a welcome message.

To give you an idea what VirtualBox might look like later, after you have created many machines, here's another example:


NEXT

Installing VirtualBox Guest Additions For Linux in RHEL 5.0 Server

Installing VirtualBox Guest Additions for Linux in RHEl 5 Server 32-bit x86:

Step1. Preparing guest RHEL system for building external kernel modules.

Mount RHEL DVD under a directory in /mnt and install the packages listed below.
1. kernel-devel-2.6.18-8.el5.i686.rpm
2. libgomp-4.1.1-52.el5.i386.rpm
3. glibc-headers-2.5-12.i386.rpm
4. glibc-devel-2.5-12.i386.rpm
5. gcc-4.11-52.el5.i386.rpm

[root@localhost ~]# mkdir /mnt/rhrepo
[root@localhost ~]# mount -t iso9660 /dev/cdrom /mnt/rhrepo
[root@localhost ~]# cd /mnt/rhrepo/Server


Note: Package versions are for RHEL 5.0 release, those for current release of RHEL will have different version numbers.


Step2. Installing VirtualBox Guest Additions.

Mount VBoxGuestAdditions.iso :
Devices-> Mount CD/DVD-ROM->CD/DVD-ROM Image...->VBoxGuestAdditions.iso->Select

mount.JPG
[root@localhost ~]# ./VboxLinuxAdditions86.run
[root@localhost ~]# mkdir /mnt/vbadd
[root@localhost ~]# mount -t vboxsf  sharefolder_name(eg:dload) /mnt/vbadd
[root@localhost ~]# vi /etc/fstab
 and put under fstab for permanent mount
[root@localhost ~]# reboot

Tuesday, September 20, 2011

SYSTEM SERVICES (DAEMONS)

SYSTEM SERVICES (DAEMONS)
The system services can be classified into 2 types: /etc/xinetd.d based & /etc/rc.d/init.d based services.
/etc/xinetd.d --based services are

telnet finger imap ipop2 ipop3
pop3s rlogin rsh sgi_fam
the executable daemons of these services are at /etc/rc.d/init.d, named xinetd

/etc/rc.d/init.d – based services are
apmd autofs dhcpd halt httpd
iptables kudzu named network nfs
portmap sendmail snmpd smb ssh
squid vncserver vsftpd xinetd ypbind
ypserv zebra

 apmd automatic power management daemon
 autofs automatic file system
 dhcpd dynamic host configuring protocol daemon
 httpd hyper text transfer protocol daemon
 iptables for fire wall security
 kudzu enabling plug and play facility
 named for bind (DNS-Domain Name System) server
 nfs network file system
 portmap services that starts when n/w is enabled
 sendmail used for mail server application
 snmpd simple n/w management protocol
 smb samba server (Linux/windows connectivity)
 ssh secure shell daemon
 squid proxy server
 vncserver remote desktop sharing
 vsftpd very secure file transfer protocol daemon
 xinetd enable /etc/xinetd.d services
 ypbind NIS(n/w info server) client
 ypserv NIS server
 zebra used for routing.

Ways of enabling these services:-
chkconfig enabling a service this way keeps a service enabled until next restart.
#chkconfig - -list service_name displays the current run level of that service.
#chkconfig service_name on/off used to enable/disable a particular service
#chkconfig - -levels 35 service_name on enables that service on run levels 3,5


Run control script resides in /etc/rc.d contains script files for rc0 to rc6. [the script file starting with ‘S’ represents the scripts to be start-up during next system boot and the script starting with K represents the stopped scripts].

#ntsysv cmnd used to enable or disable a service during next start up too.

Enable Services

#/etc/rc.d/init.d/service-name start/stop/restart/reload/status
OR
#service service-name start/stop/restart/reload/status

Configuring a YUM Repository
-------------------------------

Steps:

Make sure ftp server package is selected while installing the m/c in which we are planning to create a yum repository.


Copy all rpms from the corresponding directory on RHEL DVD to somewhere under /var/ftp/ say /var/ftp/pub/Server

install createrepo rpm which is inside the rhel dvd

#createrepo /var/ftp/pub/Server

that's all yum repository is ready to use.

To make it available for other machines in the network via ftp

#/etc/init.d/vsftpd start
#chkconfig vsftpd on

On client machines
let our yum repository is available at 192.168.0.254

#cd /etc/yum.repos.d/
#cat > test.repo
[first repo]
name= my first repo
baseurl=ftp://192.168.0.254/pub/Server
enabled=1
gpgcheck=0

ctrl+c

#yum list all

To check whether a package is installed or not

#rpm -qa | grep -i

To install something using YUM

#yum install

/etc more tremcap
Etc less termcap
Find -name
Find -perm 700
Find - uid 500
Find –size

Ln -s --------soft link
Ln ----------hard link


Umask –S | umask in symbolic form
Find –print | grep xorg.conf

Environmental Variables $PATH $DISPLAY $PS1 $TERM $USER $HOME $SHELL

Set command shows all the variables

PATH=$PATH:/root

Sunday, September 18, 2011

LINUX NETWORKING

LINUX NETWORKING

What Is A LAN?
• A Local Area Network (LAN) is a grouping of ports on a hub, switch or tied to a wireless access point (WAP) that can only communicate with each other.
• It is possible to have LANs that span multiple switches. Simple home switches can be connected in a chain formation to create a LAN with more ports. This is often called “daisy chaining”.
• Pure switches provide no access control between servers connected to the same LAN. This is why network administrators group trusted servers having similar roles on the same LAN. They will also ensure that they don’t mix servers on different IP networks on the same LAN segment. A good rule of thumb is to have only one network per LAN.
• Communication to devices on another LAN requires a router directly connected to both LANs. The router is also capable of filtering traffic passing between the two LANs therefore providing additional security.
• Larger, more expensive switches can be configured to assign only certain ports to pre-specified Virtual LANs or (VLANs) chosen by the network administrator. In this case, the switch houses ports on multiple LANs. A router is still needs to be connected to each VLAN for inter-network communication.


What Is A Hub?
• A hub is a device into which you can connect all devices on a home network so that they can talk together. Hubs physically cross-connect all their ports with one another which causes all traffic sent from a server to the hub to be blurted out to all other servers connected to that hub whether they are the intended recipient or not.
• Hubs have none or very little electronics inside and therefore do not regulate traffic. It is possible for multiple servers to speak at once with all of them receiving garbled messages. When this happens the servers try again, after a random time interval, until the message gets through correctly.
What Is A Switch?
• A switch is also a device into which you can connect all devices on a home network so that they can talk together. Unlike a hub, traffic sent from Server A to Server B will only be received by Server B. The only exception is broadcast traffic which is blurted out to all the servers simultaneously.
• Switches regulate traffic, thereby eliminating the possibility of message garbling. Switches therefore provide more efficient traffic flow.

• Devices that plug into switches should be set to full duplex to take full advantage of the dedicated bandwidth coming from each switch port.
What Is A Router?
• As stated before, switches and hubs usually only have servers connected to them that have been configured as being part of the same network.
• Routers will connect into multiple switches to allow these networks to communicate with one another.
• Routers can also be configured to deny communication between specific servers on different networks. They can also filter traffic based on the TCP port section of each packet. For example, it is possible to deny communication between two servers on different networks that intend to communicate on TCP port 80, and allow all other traffic between them. Routers therefore direct and regulate traffic between separate networks, much like a traffic policeman.
• If you intend to route between networks, then for each network, you must reserve an IP address for a router and make sure that the router is directly connected to the LAN associated with that network.
• In home networks, routers most frequently provide connectivity to he Internet using network address translation or NAT.

Network Protocols
The word protocol simply means set of rules. There are different types of protocols available. These differ according to the OS we use. For example:

Unix/Linux use TCP/IP

Windows supports the following protocols
NetBEUI (Net Bios Extended User Interface).
TCP/IP (Transmission Control Protocol/Internet Protocol)
NwLink IPX/SPX Compatible Protocol (Internet Packet Exchange/
Sequenced Packet Exchange)
Apple Talk used if Apple Mackintosh Os is to be used.

Novel Netware use IPX/SPX


TCP/IP (Transmission Control protocol/Internet protocol)
TCP/IP is a universal standard suite of protocols used to provide connectivity between networked devices. It is part of the larger OSI model upon which most data communications is based.

One component of TCP/IP is the Internet Protocol (IP), which is responsible for ensuring that data is transferred between two addresses without being corrupted.
For manageability, the data is usually split into multiple pieces or “packets” each with its own error detection bytes in the control section or “header” of the packet. The remote computer then receives the packets and reassembles the data and checks for errors. It then passes the data to the program that expects to receive it.
 It is a protocol stack
 Managed by Inter NIC
 It is classified in to 32 bits, this again classified into 4 octats, each octet varying from 0-255 Eg of an Ipaddr is 192.168.10.33
 InterNIC classifies 32 bit IP address into different classes: - class A, class B,class C, class D
 This classification is based on no: of machines or no: of hosts/per network.
 By default communication between diff network is not possible.
 The first octet value represents the class, which it belongs to.
o Class A 1st octet value is b/w 0-126 ie, n/w.host.host.host
That is 28 n/w and 224 hosts/network eg: -10.1.100.220
The default subnet mask is 255.0.0.0
o Class B 1st octet value is b/w 128-191. ie, n/w.n/w.host.host
That is 216 n/w and 216 hosts/network eg: - 128.1.100.127
The default subnet mask is 255.255.0.0
o Class C 1st octet value is b/w 192-223 ie, n/w.n/w.n/w.host
That is 224 n/w and 28 hosts/network eg: -200.168.56.100
The default subnet mask is 255.255.255.0
o Class D 1st octet value is b/w 224-239
Normally not used. Used only in multitasking.
o Class E  octet value lies b/w 240-255
This too is normally not used.

Note The IP address beginning with 127 can be called the loop back address and is used to test the system independently.

Broadcast Id the id used to communicate with an entire group
Network Id the Id used to communicate with a particular group.
Subnet mask used to calculate the broadcast id and network id. If the subnet mask is 255.255.255.0 (in the case of a Class C network), it means there is no subnet.
Subnet masks are used to tell which part of the IP address represents. The network on which the computer is connected (Network portion). The
computer's unique identifier on that network (Host portion)
MAC Media Access Control id is the independent id of a machine, it will be the h/w address or NIC no: of the machine.

Private IP Address These addresses can be used with your internal N/w and do not need to be registered with interNIC for local n/w.

Class A 10.0.0.0 to 10.255.255.255
Class B 172.16.0.0 to 172.31.255.255
Class C 192.168.0.0 to 192.168.255.255


CONFIGURATION OF NETWORK INTERFACE CARD
#netconfig to configure your n/w or NIC card
the value gets active only after u restarts the system
#ifconfig to display IP information of NIC card.
#ifconfig device_name ipaddr subnetmask to give a new IP address
Eg:- #ifconfig eth0 192.168.1.65 255.255.255.0
#ifconfig eth1 192.168.23 helps to give a virtual IP address to the same NIC card.
If there are more than one NIC cards, then also the same way is used to give IP addresses to the NIC cards.
#ifconfig eth0 down to disconnect the machine from the n/w
#ifconfig eth0 up to enable networking
#ping ipaddr to test if your networking if proper or not.
Eg:- #ping 127.0.0.1

The file named /etc/sysconfig/network contains the following information like whether networking is enabled or not, the host name and domain name of the machine.


NETWORKIN=yes
HOSTNAME=linux5
DOMAINNAME=nascent.com

The file named /etc/sysconfig/networking/devices/ifcfg-eth0 contains the following information like device name, whether the device is to be detected at boot itself, whether the IP is static or not, IP address, mask value etc.
DEVICE=eth0
ONBOOT=yes
BOOTPROTO=static
IPADDR=192.168.1.65
NETMASK=255.255.255.0
The boot protocol information can be of two types—static or auto(auto means gets ip from DHCP server)

The netconfig cmnd creates the above file “ifcfg-etho” using the script in /etc/sysconfig/network-scripts

Configuring Hostname Resolution

To resolve host name, edit the following file, ie,
#vi /etc/hosts
192.168.1.65 nascent.com linux3. nascent.com

host name of the machine
domain name or any alias name given to the system.

ipaddr
[then quit from the file.]

Port Definitions

There are about more than 65,000 ports available for communication.
For a TCP/IP & UDP the port nos are as follows:
 0 - 1023 (well known ports)
 1024 - 49151 (Registered ports)
 49152 - 65535 (Dynamic and/or Private ports)

Port values are defined in /etc/services

Port values of some commonly used services are as follows.

Service name Port value
ftp 21 *
Ssh 22
telnet 23 *
Smtp 25 *
Name server 42
tftp 69
Finger 79
http 80 *
Pop3 110 *
Imap 143 *
snmp 161
Ldap 389
https 443 *

[here * is used to show that all these are important port values]

# service_name IP:portvalue helps to communicate in the specified port value of the machine that has the given id.
Eg: #telnet 192.168.1.65:1009 is the case in which we have changed the
telnet port value from 23 to 1009

Monday, August 29, 2011

USER & GROUP MANAGEMENT

User Management
#useradd username (OR) #useradd username used to create a new user.
#passwd username It changes password for the corresponding user.
User add can also be done by specifying a no: of attributes like
#useradd –u uid –s shell –c command –d home_directory –g group –G groups username
uid user identification no, 0-99 for system purpose, 0 reserved for root,
100-60,000used for general purpose.
gid group identification no, 0-99 for system purpose, 100-600 for general purpose
pid process identification no, to identify all the processes running on your system
groups - maximum of 15 groups is only possible as secondary group for a user.

#usermod attributes username helps to modify already given attributes.
#userdel username only deletes an existing account, not user directory.
#userdel –r username deletes a user account along with home directory.


GROUP
#groupadd groupname adds a new group
#groupadd attributes groupname adds a new group along with its attributes.
#groupmod groupname modifies the attributes of a group
#groupdel groupname deletes an existing group

#id –u username displays the userid no of the user specified
#id username displays uid,gid and all secondary groups that user
#groups displays the default groups in your machine

Switch User
#su username to change from current user to user specified
#su – username change to the specified user along with his home directory.


/etc/profile
Contains several information regarding the history size, the umask value etc, which is applicable to all the users.

#vi /etc/profile
:
HISTSIZE =1010 [this entry helps to change the history size]
:
echo [this entry will help display what ever written after it]
echo Welcome $USER [helps display “Welcome root” if u have logged as root]

echo
sleep 2 [waits for a period of 2 seconds]
clear [helps to obtain a clear window]

After editing this file quit from vi. All this will become applicable if u login again.

#vi /home/nas/.bash_profile helps to change the login contents if u login as a normal user (here the user is nas)

#vi /home/nas/.bash_logout helps to create log out contents for a user(here it is nas)

#vi /etc/issue helps to change the appearance of the log in screen

#vi /etc/issue.net for networking ie, when u log in using network(ie like telnet etc) then the screen appearance for them can be set using this.

#vi /etc/syslog.conf all the log files generated during boot time are kept here

#vi /etc/motd displays the message of the day.

/etc/passwd user id information resides here.
#vi /etc/passwd

nas:x:509:509: :/home/nas:/bin/bash

GID home dir Login shell
UID comment
password
user name

Here the ‘:’ is called the delimiter. Here ‘x’ represents the password, which resides in another file /etc/shadow
#vi /etc/shadow

nas:$1$Dn……………..
This contains 9 fields, which are
Loginid:password:lastchange:min:max:warning:inctive:expiry:


/etc/group  the group id information resides here.
#vi /etc/group

groupname:passwd:gid:users list


FILE PERMISSIONS
We can change the permissions of a file in either using the Symbolic Mode or by using the Absolute Mode.
1.Symbolic Mode :-here we use r for read, w for write , x for execute and
‘+’ to append a permission,’-‘ to remove a permission.
chmod is the command used to change permission bits.
#chmod u=rwx,g=rx,o=r filename
#chattr change the attributes of file ie, who all can delete or add files
’+’ is used to add and ‘-‘ is used to remove permissions.
Eg:- #chattr +i filename - now none will be able to change the file contents.
#chattr –i filename - then it is removed & all functions can be performed

2.Absolute Mode:-here we use nos from 0 to 7.

Value Indications Permissions
0 - - - No permission
1 - - x Only execute
2 - w - Write only
3 - w x Write and execute
4 r - - Read only
5 r – x Read and execute
6 r w - Read and write
7 r w x Full permission

Eg:-#chmod 765 filename full permission for owner, read & write for group members, read & execute permission for others.

Sticky bit
#chmod 1000+file_permission filename here the value 1000 implies it’s a sticky bit
#chmod 1766 f1 implies it is a sticky bit.
#ls –l -rwxrw-rwT
#chmod 1767 f2 I implies it is a sticky bit.
#ls –l -rwxrw-rwt
here T  sticky bit is enabled and executable bit for others is OFF
and t  sticky bit is enabled and executable bit for others is ON
i. When sticky bit is set on a dir,files in that dir may be unlinked or renamed only by the root user or by its owner.
ii. Commonly found in dir like /tmp, that are world –writable.

Set UID & GID :- is applicable to an executable file & is used for project sharing.
#chmod 4000+file_permissions filename  here 4000 implies enable UserID

#chmod 2000+file_permissions filename  here 2000 implies enable GroupID
Eg:- #chmod 4777 file4
#chmod 2777 file5
#ls –l
-rwsrwxrwx ……………… file4
-rwxrwsrwx ……………… file5

#umask whenever a user creates a file, the OS assigns default permissions to the file with out the intermission of the user. It is defined by the umask value specified in /etc/profile. the default umask value os 022, but the value 027 is more effective. So the default file permission is 666 & that of a directory is 777.

Change ownership:-
Root is the only user who has the permission to change ownership of a file. So in case, if u have logged in as a normal user, u have to log in as root to do this. The cmnd used for this purpose is ‘chown’

#chown nas f3 to change the ownership of the file f3 from current owner to nas

Sunday, August 28, 2011

EDITORS

EDITORS

Different types of editors are available.Some of them are vi, emacs, joe, pico etc.

Here we are going to deal with vi editor.

VI EDITOR

#vi is the command used to open vi editor. Inorder for this editor to work successfully, one has to use both command mode and insert mode.
Command mode (press Esc key)
Insert mode (press I or Insert key)—data entering is possible only in this mode.
#vi filename opens an existing file or creates a new file

To exit from vi first go to cmnd mode (ie, press Esc), then press
:q to simply quit
:q! to quit forcefully
:w save the changes or entries given
:w newfilename - to save the file in a new name (similar to copy cmnd)
:wq to write and quit

To edit, delete & change text using a vi editor, first go to cmnd mode, then
(i) press x to delete a character from the cursor position
(ii) press dd to delete or cut a line
press 2dd deletes 2 lines from cursor position
(iii) press r to replace a character
(iv) press yy to copy text
press 4yy copy 4 lines from current cursor position
(v) press p to paste the copied or cut lines
(vi) press u undo
(vii) type :set nu to display line numbers, temporarily
(viii) type :set nonu remove the line numbers
(ix) type :sh to return to shell prompt with out leaving the vi editor. To go back to vi editor from this shell prompt, type exit
(x) :!ls used to display directory contents in vi editor.

To search a string in an editor, first go to cmnd mode, then type
/var to search a string named var in the file opened in the vi editor.

To search and replace string in an editor, first go to cmnd mode, then type
:g/redhat/s//nascent/g the word redhat is searched and replaced with nascent.

DEVICE CONFIGURATION

#timeconfig used to configure time zone
#mouseconfig to configure mouse
#setup used for configuring devices like mouse,network,printer,system services,etc
#printconf used to configure printer
#netconfig to configure network.It replaces existing configuration file (/etc/sysconfig/networking/ifcfg-eth0).

Device Configuration in X-window Mode

# system -config-time for time settings
# system -config-keyboard for keyboard settings
# system -config-languages to configure language options
# system -config-mouse configure mouse
# system -config-network configures networking
# system -config-printer to configure printer
# system -config-xfree86 works in both text and graphical mode(display card)
# system -config-sevices configure system services
# system -config-securitylevel used for firewall configuration
# system -config-soundcard configures soundcard
# system -config-users configure users and groups
# system -config-packages to install or uninstall packages(like add/remove in windows)

DISK MOUNTING
CDROM
#mount /dev/cdrom /mnt/cdrom (OR) #mount /mnt/cdromcmnd used to mount a cdrom
to read the contents of a cdrom, you have to use the cmnd
#cd /mnt/cdrom then use ls cmnd and read.
To unmount a cdrom, first u have to come out of the cdrom’s directory and then
#umount /mnt/cdrom then give the cmnd #eject

FLOPPY DISK
#mount /mnt/floppy (OR) #mount /dev/fd0 /mnt/floppy.
To unmount a floppy, use the cmnd
#umount /mnt/floppy

FDD & CDROM gets automatically mounted in the case of X-Window mode.

The file /etc/mtab contains already mounted file systems.

#mount –a mounts all file systems (other than the ones with auto)
#umount –a unmounts all file system types.

Files to be mounted at boot time:
The file named /etc/fstab contains the file system to be mounted during system startup.

#cat /etc/fstab (contains the following entries)

LABEL=/ / ext3 defaults 1 1
LABEL=/boot /boot ext3 defaults 1 2
/dev/cdrom /mnt/cdrom udf iso9668 noauto,owner,kudzu……
/dev/fd0 /mnt/floppy auto noauto owner,kudz……

This file /etc/fstab contains 6 columns.
1st column indicates device information
2nd column indicates mount points
3rd column indicates file system (FAT,ext2/3 etc)
4th column indicates mount point options available with file systems
5th column indicates dump option (ie, if it has to be checked at rebooting)
6th column indicates the order in which file system checks are done at reboot time (here 1,2…indicates the priority)


DISK PARTITIONING and FORMATING
#fdisk command used for disk management (disk partitioning tool)
#fdisk /dev/hda hard disk then press Enter key.

Command (m or ? for help):m [displays help]
:p available partitions
:n adds a new partition
:d deletes a partition
:q quit
:w write/save partitions
:l list known partition types
:t changes a partitions system id

#mkfs –t file_systemtype partition_no: -->creates a file system(cmnd used to format) eg:- #mkfs –t ext3 /dev/hda….
#tune2fs used to adjust tunable file system parameters
#e2fsck check a Linux partition manually(like scan disk in windows)
#fdformat /dev/fd0 cmnd used to format floppy disk.

RUN LEVELS
The default run level information resides in /etc/inittab and the run control scripts for all run levels resides in /etc/rc.d/…

The default run levels used by Red Hat systems is :

#init 0 halt or shut down the machine
#init 1 single user mode or the maintenance mode
#init 2 multi-user mode with out NFS
#init 3 full multi-user mode
#init 4 unused (User-Defined)
#init 5 X-window mode
#init 6 Reboot

If we edit the file /etc/inittab, then we can change the default run level.


Messaging & Scheduling Shutdown
#wall ‘message’ broadcast the message typed to all users in that n/w
#write usrname/terminal [press enter] message [press cntrl+z] used to send message to a particular user.
#write nas [press enter] Hello [press cntrl+z]will send Hello to nas
#write nas tty3 [press enter] there? [press cntrl+z]if more than one person has logged in as nas and if u want to send to a person who is in
terminal3, then this cmnd helps to do so.
#mesg n ->controls/blocks user messages (only normal users not root users)
#shutdown –f –h +60 “message” server will shutdown automatically in 60 mins
#shutdown –c will cancel the scheduled shutdown process.

PACKAGE MANAGEMENT
In x-window mode, the command used to add/remove packages is
#redhat-config-packages

In text mode, we use rpm (red hat package management) command. For this
1st mount your Linux CD #mount /mnt/cdrom
then go to the dir #cd /mnt/cdrom/RedHat/RPMS
the extension of all files in this dir will be .rpm

#rpm –ivh packagename to install the specified package
eg:- #rpm –ivh telnet-serve… .rpm to install telnet server

Here ivh install verify hash(show #)
#rpm –e packagename to remove an existing package
#rpm –Uvh packagename will install if package is absent or upgrade an existing one
#rpm –ivh - -nodeps - -force packagename install packages with out dependencies.
#rpm –qa shows all installed packages
#rpm –q packagename shows if the mentioned package is installed or not
#rpm –qa | grep ‘string’ to display installed packages that has the specified string in it
#rpm –ql file_name To display package to which that file belongs to .

After installing or removing a package, u must update using the command #updatedb

Thursday, August 25, 2011

LINUX BASIC COMMANDS

LINUX BASIC COMMANDS

#clear clears the screen
#date displays date and time
#cal displays calendar of current month
#cal 1980 displays calendar of year 1980
#cal 5 2020 displays calendar of 5th month of the year 2020.
#hostname to display the host or machine name
#hostname Nascent changes the host name to Nascent from the current one
#domainname to display the current domain name or FQDN
#domainname nas.com changes the domain name to nas.com

The hostname , domain name & network information resides in the following file:
/etc/sysconfig/network

X-Window Mode:-

#startx to enter Linux graphical mode from a text mode.
#init 5 also used to enter graphical mode from a text mode.

Cntrl+Alt+Backspace to quit from x-window mode.

Shut down from LINUX:-

#logout is the command used to logout from a user session
#reboot is the command used to restart or reboot
#init 6 also helps to restart or reboot the system.
#init 0 is the command used to shut down the system.
#halt ,
#poweroff can also be used to shut down the system.

ctrl+d to logout from a user session
ctrl+c interrupts a currently running process and quit from it.
ctrl+w helps to remove word by word
ctrl+u helps to remove a line

#whoami displays the name of currently logged in user.
#who am i displays effective userid (if using ‘su’ cmnd).

#who displays information of all users who have currently logged in.
#finger displays the full information of a user
#users displays all users who have currently logged in
#groups displays all groups
#w displays the information about the users currently logged in along with their processes
#pwd shows the present working directory
#echo $PATH displays the current path of that user.
#uptime tells how long the system has been on
#last show listing of last logged in users.
#dmesg helps to view all boot time messages.
#ps list running processes
#ls displays the directory contents

#ls -l displays files with their attributes. Eg: --rw-r-
#ls -a shows all files including hidden files
#ls -al shows all files along with hidden files and the attributes of each file
#ls -i displays files and its nodes
#ls -sh to display size of a file in human readable form like KB, MB etc.
#ls | more displays directory contents page wise.
#ls a* displays all files starting with ‘a’
#lp to print linux documents
#uname print system information
#uname –a print all information
#uname –m prints all machine information
#uname –r prints kernel release version
#uname –s prints kernel name
#uname –o prints the name of the OS

#Whereis cmnd locate the binary, source, man page files.
#info cmnd displays the information/help of the command given.
| more to display page by page. Eg: -ls | more
| sort to display in alphabetical order. Eg: - ls |more | sort

Directory and File Manipulation: -
#touch filename creates null or zero content files.
#cat > filename creates a new file
#cat filename displays the content of that file.
#cat f1 >f2 creates a copy of the file f1 as f2.
#cat >> f4 helps to append a line to the end of a created file.

#mv helps to rename or move location of files/directories.
#mv f3 f5 renames f3 to f5
#mv f4 /etc/ moves the file from current location to given location.


#rm f4 deletes a file named f4.
#mkdir directoryname creates a new directory.
#mv d1 d2 changes directory name from d1 to d2
#cd d3 used to change to directory d3.
#cd .. used to change to previous directory.
#cd / used to change to root directory.
#rmdir dirname to delete an empty directory
#rm –r dirname to delete a directory which is not empty and also needs confirmation.
#rm –rf dirname to delete a directory forcefully with out asking for confirmation.
#cp f1 f2 used to copy file f1 to f2
#cp –R dirname copies a dir along with all its contents(subdirectories)
#less filename to display file content page wise.
#head –2 filename displays the first 2 lines of the file specified.
#tail –5 filename displays the last 5 lines of the mentioned file.
#diff f1 f3 displays the difference between the files f1 and f3.
#cmp f1 f3 compares the 2 files f1 and f3.
#wc –l filename displays the no: of lines in the particular file.
#wc –c filename displays the no: of characters in specified file.
#df –m displays all Linux partitions with memory size in MB.
#fdisk command used for disk management

File Attributes

LINK
Links can be classified into 2 types, they are Soft link and Hard link.

#ln filename link-name used to create Hard link
Here the inode value is same for both file and link. Here even if the source is gone, the link will still exist. Hard link cannot be created for a directory.

#ln –s file/dir_name link-name used to create Soft Link
Here the inode value is different for file and link. Here if the source is gone, the link not work.


Search a File from Command Mode: -
#find directory –name filename
Eg:- #find /etc –name god to search a file named god in the directory /etc.
#grep ‘string’ filename search a particular string/text in the given file.
Eg:- #grep ‘default’ /etc/inittab to search a string named default in this file.
#ls | grep ‘string’ to search all files/dir starting with the given string
Eg:- #ls | grep ‘init’ to search all files starting with init
#whatis lists directory contents
#locate item to be searched to search that particular item
Eg: -locate binaries search for binaries.

Wednesday, August 24, 2011

INSTALLATION AND PLANNING

INSTALLATION AND PLANNING
The first step in installation planning is to determine the need that the system must satisfy. Installation will go more smoothly if you have collected information about the hardware on the system.
Before beginning the installation, you will have to gather the following details:
 CPU: type and speed
 Motherboard: bus type such as ISA, EISA, VESA, PCI, MCA and so on.
 System RAM: size
 Network Adapters
 Modems: IRQ, DMA and IO ports used.
 Sound cards: make and model
 Serial and Parallel ports
 Mouse: type (serial, PS2 or Bus)
 Video Cards: make, model, chipset, amount of RAM and color
 Monitor: Make horizontal sync range and vertical sync range.

If your system will be attached to a network, you should have the following information available:

 Method of IP address assignment: static, DHCP, BOOTP
 For statically defined hosts, you should have the following information available:

o IP address
o Netmask

o Gateway
o Fully qualified domain name (FQDN)

Selecting the Installation User Interface

Red Hat Linux supports different installation types:
Beginners generally find the graphical mode installation procedure easier to use. However, you may prefer the text mode installation for the following reasons.

 The graphical mode installation procedure may fail if the target system has unusual video characteristics, such as an old uncommon video adapter.
 The text mode installation can recover from some errors – such as running out of disk space – that cause the graphical mode installation procedure.
 The text mode installation will run better and faster than the graphical mode installation on computers having slow processor or a small amount of RAM.
Selecting the Installation Class

The Red Hat Linux installation procedure provides three default installation classes or configuration.
 GNOME Workstation (Only install GNOME desktop manager. It doesn’t disturb other non Linux partitions in the Hard Disk)
 KDE Workstation (Only install KDE desktop manager. It doesn’t disturb other non Linux partitions in the Hard Disk)
 Server (It disturbs other non-Linux partitions in the Hard Disk. So other file system may be corrupt.)
 Custom (You can customize your installation. It doesn’t disturb other non Linux partitions in the Hard Disk )

During Installation you will have to create at least two partitions named Linux native (ext3 file system) partition and Linux SWAP partition. Minimum of 3 GB space required for Full Installation in the case of Red Hat 7.2.

The main partitions are:
 A swap partition: Its size may be 2-3 times of available RAM and create up to 8 swap partition but total swap space can’t exceed 4GB.
 A boot partition: 16MB – 30MB (/boot)
 A root partition (/): That uses the remaining free disk spaces.

Partitioning the Hard Disk

If you select either of the workstation installation classes or the Server installation class, the installation procedure partitions your hard disk drive

automatically. However, if you select the Custom installation class, you must manually partition the hard disk.


Directories that are often made mount point of separate partition include:

/home /opt /tmp /usr /var

/boot: It should be kept in a separate partition with in 1024 cylinder region (between 9 GB space), that is addressable by the system’s BIOS.

In designing the partition structure, the following directories should be kept in a single partition:

/ /etc /bin /sbin /lib

/dev /mnt

Using fips

Often, a target system has insufficient free disk space for installing Linux. If an MS-DOS (FAT or FAT32) partition contains unused space, you can use to split the partition, creating empty partition into which you can install Linux.

To use fips, follow these steps:
1. Use scandisk to check the partition for errors.
2. Use defrag to move the file to the low end of the partition.
3. Disable virtual memory by using the system control panel applet.
4. Create MS-DOS boot floppy by using the Add/Remove programs Control Panel applet.
5. Copy the following files from the installation CDROM to the floppy disk. Restrrb.exe, fips.exe, errors.txt from Linux CD (\DosUtils\fips20)
6. Boot from the floppy and run fips

Note: we can use any other third Party disk Partitioning Tool (eg: Partition Magic)

Booting from a Boot Floppy Disk
Dos/Win Linux/Unix
Install Floppy  Insert a formatted floppy.
 cd \dosutils
 rewrite
 Image file is …\images\bootdisk.img
 destination is a:  Insert a formatted floppy
 mount /mnt/cdrom
 dd if=/mnt/cdrom/images/bootdisk.img of=/dev/fd0 bs=1440k

Boot Disk  mkbootdisk --device /dev/fd0 2.2.12-2.0


Note:
We can select installation media via following methods.
Local CDROM, FTP, HTTP, NFS


Console and Message Logs
Console Keystrokes Contents
1 Ctrl+Alt+F1 Text-based installation procedure
2 Ctrl+Alt+F2 Shell prompt
3 Ctrl+Alt+F3 Messages from installation
4 Ctrl+Alt+F4 Kernel messages
5 Ctrl+Alt+F5 Other messages, including file system creation messages
7 Ctrl+Alt+F7 Graphical installation procedure

Boot Loaders
A boot loader is the first software program that runs when a computer starts.It is responsible for loading and transferring control to an operating system “kernel” software. The kernel, in turn, initializes the rest of the operating system.
Linux Loaders:- There are two types of Linux loaders. They are LILO and GRUB.

LILO :- LInux LOader is available in almost all Linux flavours. Lilo configuration file resides in /etc/lilo.conf

lilo –v installs a boot loader that will be activated next time you boot

GRUB:- Grand Unified Boot loader is a flexible and powerful boot loader programmed for PC’s. It can load a wide variety of free operating systems. GRUB understands file systems and kernel executable formats without recording the physical

position of your kernel on the disk. GRUB configuration files resides in /etc/grub.conf

grub-install installs grub on your drive.

Monday, August 22, 2011

The UNIX files structure

The UNIX files system internal structure
The boot block
The boot block is usually a part of the disk label. A special set of blocks containing information on the disk layout. The boot block holds the loader to boot the operating system.

The super block
Each UNIX partition usually contains a special block called the super block. The super block contains the basic information about the entire file system. This includes the size of the file system the list of free and allocated blocks the name of the partition, and the modification time of the file system.

Inodes
Information about each file in the file system is kept in a special kernel structure called an inode. The inode contains a pointer to the disk blocks containing the data in the file, as well as other information such as the type of file, the permission bits, the owner and group, the file size, the file modification time, and so on. The inode does not however contain the name of the file. The name of each file is listed in the directory the file associated with. A directory is really just special type of file containing a list of filenames and associated Inodes; When a user attempts to access a given file by name, the name is looked up in the directory where the corresponding inode is found.

The inode structure is used to explain the difference between a hard link and a symbolic link. A hard link is just another directory entry corresponding to the inode of the file. Neither link is considered to be the real file; both of them are. By adding a hard link to a file, the file has multiple names associated with it. Any changes made to one will affect the other. A file is considered deleted when all of the hard links to it (including the original link to the file) are removed. Renaming one of the links or even the original file will not affect the validity of the other links.

By contrast, a symbolic link is actually a special type of file that contains the name of the file it points to. This file has its own inode and is distinct from the original; it contains only a reference to the pathname of the file

being linked to. When the kernel accessed a symbolic link, it recognizes that it is a pointer to another file, and attempts to find that file. This is why symbolic links will become bad if the original file is moved or deleted; they reference only the name of the original file, not the actual data of the file.

#ls –i displays inode values and file names.

Understanding the Red Hat Linux file system

Like other Unix systems, red hat Linux has a hierarchical file system. The top most directory known as root directory of the file system contains several other directories, sometimes called subdirectories. These directories in turn generally contain subdirectories and files.

The directory structure is not arbitrary. For packages to work properly, the location of important files and directories must be standardized.

The Root (/) Directory

The root directory (/) of a Linux system is the directory that contains all other directories and files. Other directories may be separately mounted and the may or may not be present at system startup. Therefore the file system that contains the root directory must contain all files necessary to operate the system in single user mode. The root directory also contains all files needed to shutdown and recovers or repairs the system.

The following directories are essential and must be part of the root file system.

/bin, which contains binary files used by the system administrators and other users.
/sbin, which contain binary files used by the system administrator
/dev, which contains device files
/etc, which contains host specific configuration data
/lib, which contains system libraries

Linux systems typically include several other directories, which may be used as mounting points for non root file systems or which may be used mounting points for non root file systems or which may contain directories and files that reside on the root file system. Some commonly used directories include

/boot, which contains files needed by the boot loader when booting the system. These files could be placed in the root partition. However, Red Hat, inc. recommends that they be placed in a separate partition to overcome common PC BIOS limitations on the location of boot data

/home, which contains users home directories
/lost + found, which contains files recovered during file system rebuilds

/mnt, which contains mount points for temporarily mounted file systems
/proc, which contains system information
/root, which contains the home directory of the root user.
/tmp, which contains temporary files
/usr, which contains shareable, files not essential to basic system operation
/var, which contains non shareable file snot essential to basic system operation
/media, which contains cdrom ,floppy drives only (only in EL-4)

/bin: The Essential Binary Files

It contains files that are generally commands.
Example: df, netstat, kill, su, ping, echo, pwd, touch, cat , ls, rm ,umount, rmdir, uname, chmod, mkdir, rpm, vi, cp, more

/boot: Boot Loader Files

Many PCs contain BIOS code that cannot load a boot record unless the boot record is stored below a given cylinder (usually 1024) of a disk drive. Red Hat recommends that you avoid boot problems by placing boot loader files in a separate partition and placing the partition on a region of the disk that is accessible to the BIOS
The /boot partition generally contains the first stage of the Linux loader (LILO) in its MBR, located on the first cylinder of the partition. It also contains files such as:
Boot.b, vmlinuz, etc.

/dev: Device Files

The Linux /dev directory includes a variety of device files. Most important device files are
1. /dev all device files resides in this directory.


/dev/lp0 parallel port 1 (LPT1 under DOS)
/dev/lp1 parallel port 2 (LPT2 under DOS)
/dev/sr* SCSI cdrom (* implies a,b,etc)
/dev/st* SCSI tape
/dev/md* RAID array (Redundant Array of Inexpensive Disk)
/dev/eth0 Ethernet card 1
/dev/eth1 Ethernet card 2


Device File Device
/dev/fd0, fd1 Implies 1st and 2nd floppy drive (ie, A:, B: under DOS or windows)
/dev/hd* IDE Hard disk or CD Rom


/dev/hda - primary master
/dev/hda1 - 1st partition of primary master (1,2,3,4, represents partition no:)
/dev/hdb - primary slave
/dev/hdb1 - 1st partition of primary slave
/dev/hdc - secondary master
/dev/hdc1 - 1st partition of secondary master.
/dev/hdd - secondary slave
/dev/hdd1 - 1st partition of secondary slave

/dev/sd* SCSI Hard Disk

/dev/sda -1st hard disk of SCSI
/dev/sda1 -1st partition of SCSI device
/dev/ttyS0 -serial communication port 1 (COM1 under DOS)
/dev/ttyS1 -serial communication port 2 (COM2 under DOS)
/dev/sr* SCSI CD Rom
/dev/st* SCSI Tape
/dev/lp* Parallel Port
/dev/ttyS* Serial Communication Port
/dev/md* RAID array


/etc: Host-Specific Configuration files

It contains files and directories that are specific to local host.

Important files in /etc
Files Content
fstab File system table
fdprm Floppy disk parameters
gettydefs Login terminal characteristics
group User Groups
inittab System Startup Configuration
lilo.conf Linux Loader Configuration
motd Message of the day
mtab Mounted file system table
nsswith.conf List of sources for information on users, hosts, networks, and services
passwd User accounts
profile Shell initialization script
securetty List of secure login terminals
shadow User accounts encrypted passwords, if shadow password enabled
shells List of approved shells
syslog.conf System log configurations

exports List of nfs exports
ftp* FTP configurations files
host.conf Host name resolution configuration
hosts List of known hosts
host.allow List of hosts allowed access to services
host.deny Hosts denied access to services
host.eqiv List of trusted hosts
xinetd.conf List of internet super server
networks List of known networks
printcap Printer configuration
protocols List of known protocols
resolv.conf Host name resolution configuration
rpc List of rpc services
services List of TCP/IP services

Important subdirectories of /etc/
Subdirectory Contents
httpd Configuration of http service
pcmcia Configuration of PCMCIA slots and device
rc.d System initialization files
security Security configuration
skel User environment templates
sysconfig System configuration
X11 X windows system configuration


/home: User home directories

It contains home directories of users other than root users (whose home directory is /root). By default, a users home directory is a subdirectory of /home having the same name as user login.

/lib: Shared libraries and kernel modules

It contains libraries and modules needed to boot the system and run programs residing in the /sbin and /bin directories; other libraries resides in /usr/lib, /usr/X11R6/lib. Modules reside in subdirectories of /lib/modules. (Store files like .dll files in Windows)

Example: /lib/modules/2.2.9-15

/lost+found: Recovered files
When u recover a file system, files and data may be partially recovered resides in this directory.

/mnt: Mount point for temporarily mounted file systems

Mount point of CD-ROM (/mnt/cdrom) and floppy drive (/mnt/floppy)


/proc: System information virtual file system

It is a pseudo file system provided by the kernel that contains files and directories that let system administrators and programmers access system information.

Example:

File or Subdirectory Content
Cpuinfo Various architecture depend information
Devices Major device numbers and device group
Dma Registered ISA DMA channel in use
filesystems File system type supported by the kernel
interrupts Information on interrupts and IRQ
Kmsg Kernel message logs
Lodavg Average number of jobs in the urn queue
meminfo Memory allocation information
modules List of loaded modules
Net Network status information
Pci Configuration of PCI devices
Uptime System uptime and idle time
version The version number of running kernel

/sbin: Essential system binaries

It contains essential system binary files used by system administrator.
Example:

Halt, lilo, ifconfig, ifport, chkconfig, poweroff, init, probe, ctrlaltdel, shutdown, dump, e2fsck, mke2fs, ipchains, fdisk, fsck, reboot.

/tmp: Temporary files

It contains temporary files and subdirectories that are automatically deleted ( by default 10 days)

/usr: Sharable Files

./usr file may not be available, so it contains no files or directories that are essential for system operation. Soure codes are stored in /usr/src dir .

Important subdirectories of /usr


Subdirectory Content
/usr/bin Commands used by the ordinary

users
/usr/include Header files
/usr/lib Programming libraries
/usr/man Man files
/usr/src Soruce code

/var: Non-sharable files

It may not be available, and so it contains no essential files or directories.

Important subdirectories of /var

Subdirectory Content
/var/log Log and accounting files
/var/run System information files
/var/spool Spool files including lpd and sendmail
/var/pnp Temporary files
/var/yp NIS files

Sunday, August 21, 2011

What is Linux

What is Linux?
Linux is an Operating System, which acts as a communication service between the hardware (or physical equipment of a computer) and the software (or applications which use the hardware) of a computer system.
The Linux Kernel (the core, much like a popcorn kernel) contains all of the features that you would expect in any Operating System. Some of the features included are:
• Multitasking (a technique for sharing a single processor between several independent jobs)
• Virtual Memory (allows repetitive, extended use of the computer's RAM for performance enhancement)
• Fast TCP/IP Drivers (for speedy communication)
• Shared Libraries (enable applications to share common code)
• Multi-user Capability (this means hundreds of people can use the computer at the same time, either over a network, the Internet, or on laptops/computers or terminals connected to the serial ports of those computers).
• Protected Mode (allows programs to access physical memory, and protects stability of the system)
Benefits of Linux

Linux can give you:

 A modern, very stable, multi-user, multitasking environment on your inexpensive PC hardware, at no (or almost no) monetary cost for the software. Linux is a rich and powerful platform--don't think of it as a "poor people" operating system. Out-of-box Linux has as much capability as MS Windows NT with $5000 in


software add-ons, is more stable, and requires less powerful hardware for comparable tasks.

 Unsurpassed computing power, portability, and flexibility. A Linux cluster recently (April 1999) beat a Cray supercomputer in a standard benchmark. Linux is VERY standard--it is essentially a POSIX compliant UNIX. (Yes, Linux is a best-of-the-breed UNIX. The word "UNIX" is not used in conjunction with Linux because "UNIX" is a registered trademark.) Linux is most popular on Intel-based PCs (price), but it runs very well on numerous other hardware platforms, from toy-like to mainframes.

 Connectivity to Microsoft, Novel, and Apple proprietary networking. Reading/writing to your DOS/MS Windows and other disk formats. This includes "transparent" use of data stored on the MS Windows partition of your hard drive(s).

 Dozens of excellent and free, general-interest applications.

 Thousands of free applets, tools, and smaller programs. "Small is beautiful" goes well with Linux philosophy.

 Scores of top-of-the line commercial programs including WordPerfect and all the big databases (e.g., Oracle, Sybase, but no Microsoft's). Many (most?) of these are offered free for developers and for personal use.

 State-of-art development platform with many best-of-the-kind programming languages and tools coming free with the operating system. Access to all the operating system source codes, if you require it, is also free.

 Freedom from viruses, software manufacturer "features", invasion of privacy, forced upgrades, licensing and marketing schemes, high software prices, and pirating. How is this? Linux has no viruses because it is too secure an operating system for the viruses to spread with any degree of efficiency. The rest follows from the open-source and non-commercial nature of Linux.
The operating platform that is guaranteed "here-to-stay". Since Linux is not owned, it cannot possibly be put out of business. The Linux General Public License (GPL) insures that development and support will be provided as long as there are Linux users.

FAQ
Can I run GUI Programs on Linux?
Linux has a free X Windows Graphical User Interface (GUI), similar to Microsoft Windows which allows most X Based programs to run under

Linux without any modification. Windows programs can run inside of X-Windows with the help of an emulator called WINE. Usually, Windows programs can run up to 10 times faster, due to Linux' buffering capabilities!

Will Linux work well with my network?
Networking support in Linux is advanced and superior to most other Operating Systems. Since the people developing Linux collaborated and used the Internet for their development efforts, networking support came early in Linux development. As an Internet server, Linux is a very good choice, often outperforming Windows NT, Novell and most UNIX systems on the same hardware (even multiprocessor boxes). Linux is frequently chosen by leading businesses for superior server and network performance.
Linux supports all of the most common Internet protocols, including Electronic Mail, Usenet News, Gopher, Telnet, Web, FTP, Talk, POP, NTP, IRC, NFS, DNS, NIS, SNMP, Kerberos, WAIS and many more. Linux can operate as a client or as a server for all of the above and has already been widely used and tested.
Linux also fits easily and tightly into Local Area Networks (LANs), regardless of system combinations, providing full and seamless support for Macintosh, DOS, Windows, Windows NT, Windows 95, Novell, OS/2, using their own native communication protocols. Linux can do all of this with low memory requirements.

What is a Linux Distribution?
Linux is distributed by a number of commercial and non-commercial organizations who add to, or enhance the basic functions (or kernel) of the operating system. SuSE Linux, for example, is a distribution of Linux with features of the core Linux Kernel and enhancements, which are specific to that distribution. Linux distributions come completely pre-configured to specifications set by that organization, and include configuration utilities and installers.

The Linux was first made available; setting up a working Linux system was quite a task. However Linux fans soon created Linux distributions, suits of software that made it relatively easy to install, configure, and use Linux. Two of the most popular early distributions were Soft Landing Systems (SLS) and slack ware.

Red Hat, Inc. was founded in 1994 by Bob Young and Marc Ewing. Soon thereafter, in 1995, Red Hat, Inc, created a linux distribution called Red Hat linux.

Red Hat is the dominant Linux distribution. It has won infoworld awards for three consecutive years an unprecedented achievement.

Major Linux distributors
Red Hat, Caldera systems, Corel, Debian, Mandrake, Slack ware, SuSe, Turbo Linux.

Will Linux run on my Mac?
Linux continues to develop quickly, with distributions for PowerPC, Macintosh, Amiga and some Atari's. What if Linus Torvalds stops working on Linux?
Linux is written and maintained by Linus Torvalds and programmers worldwide using the Internet as a communication tool. Linux aims towards POSIX compliance (a set of standards that show what a UNIX should be). If Linus Torvalds ever decided to abandon the project, since we have the full source code available, somebody else could take his place. The Linux kernel development will still continue no matter what happens to Linus.

What are the license restrictions?
The Linux Kernel is Copyright (c) Linus B. Torvalds under the terms of the General Public License (GPL). The GPL states that the source code must be freely distributed and that anyone is allowed to make copies for their own use, or to sell or give to other people (with a few restrictions). While most Linux software is GPL'd, this does not mean that all software developed or ported to Linux has to be. Many other licenses exist, with some commercial software packages having more restrictive licenses, such as the common copying restrictions faced by Windows users.

Are there any applications that run on Linux?
There are thousands of applications running on Linux worldwide. See "What is Linux Used For?" for a small sampling of the many ways Linux is used today.


Why is there a Penguin on Linux stuff?
Tux is the Linux mascot, chosen by Linus Torvalds, who said, "I was looking for something fun and sympathetic to associate with Linux. A slightly fat penguin that sits down after having had a great meal fits the bill perfectly.... Don't take the penguin too seriously. It's supposed to be kind of goofy and fun, that's the whole point. Linux is supposed to be goofy and fun (it's also the best operating system out there, but it's goofy and fun at the same time!)."

What is Linux used for?
Application Servers, Database Servers, Workstations, X Terminal Clients, Unix Development, Network Servers, Internet Servers Cluster Computing, Embedded systems, University systems Vertical Solutions such as Hotels, Medical offices, Reservation systems, Legal offices, Petroleum companies, Governments, Media, Telecommunications, ISPs, Resellers, Manufacturers, Retail, Financial, Trader Workstations, Corporate Developers, and more...